Monday, April 18, 2016

T-Shirt Tote Bags

Our most recent Maker program was one that I've had on my radar for ages now:  Making tote bags out of old t-shirts.  I'd seen versions of this project floating around Pinterest for ages and I heard a little buzz about a library or two that did this project at a conference last year, and I decided that it was finally time to give this one a go myself.

If you were to use Google or Pinterest to search for "t-shirt bags" you would easily find TONS of tutorials.  Some versions of this project are more involved than others in terms of finishing.  There is even a way to do this as a no-sew project, which is great if you do not have access to a sewing machine and don't have the ambition to do hand sewing with needle and thread.  The tutorial that I decided to use as a basis for this program was this one.  I liked that the finishing was pretty minimal, which would make the project easy for my teens and tweens to complete in a short amount of time.  But it also included one sewn seam on the bottom, which I appreciated.

In my advertising for this event I tried to make it clear that all participants needed to bring their own shirt to use for this project.  This makes the finished product much more personal for everyone, plus it saves me the trouble of needing to procure the shirts.  I sent a reminder email to everyone who had signed up out a few days before the program and asked that anyone who wouldn't be able to bring their own shirt contact me as soon as possible so that we could work something out.  No one contacted me, and everyone who attended (4 teens and 3 tweens) brought a shirt with them.

To do the project, we pretty much followed the instructions in the tutorial exactly as written.  I gave everyone a pair of scissors to cut the sleeves and neck of the shirts.  Fabric scissors definitely would have been ideal since they are sharper and easier to use on fabric, but we made do with the regular scissors that we had on hand.  Only one participant had trouble with the cutting but was able to get it done with a little help.

I brought in my own sewing machine from home and showed everyone the basics of how to use it.  Each participant was able to sit at the machine and stitch the bottom hem themselves.  I was impressed that about half of my participants had done some basic sewing on a machine before, and these people caught on especially quickly.  Even those who had never seen a machine before figured everything out pretty easily with some instruction.  Sewing a straight seam is actually not terribly difficult or time consuming even for a beginner, and it was very exciting for everyone - even those who had used a sewing machine before - to use this piece of equipment.  Because sewing one seam is pretty quick one machine was enough to go around for my small group, but someone with a much larger group might want to try to get a second machine for people to use.

As I instructed everyone, I also pointed out a few areas where a more professional seamstress might work extra hard to make the finished product really nice (sewing finishing hems along the bag's opening and handles, for example).  But we also talked about how we weren't professionals and why skipping some of these steps was okay for our purposes.  The teens and tweens seemed to think this was interesting and I'm glad that I was able to bring in this brief "real world" application to this simple DIY project.

For the most part, everyone finished their t-shirt bags in about 15 minutes.  Most of the participants used their bags to carry books home after the program.  I call that a success, and I would definitely consider running this program again in the future.

Tuesday, March 15, 2016

St. Patrick's Day Storytime

I was getting a bit tired of my old storytime stand-bys, so I decided to shake things up by making this week's storytime all about a holiday that I'd never shared with this crowd before:  St. Patrick's Day!  While the first things that come to many people's minds when they think of this holiday are green beer and "Kiss Me, I'm Irish" buttons, there are a lot of really nice kid-friendly symbols that can easily become the focus of this storytime.

Here are the books that I read:

Green by Laura Vacarro Seeger
This books is sparse on text, but the illustrations are full of great things to talk about.  Each two-page spread shows a different shade of green, as well as die-cut shapes that take new form as you turn the page.  As a group we had so much fun looking at and talking about the illustrations that this sparse 36-word book was easily our longest read of the day.

The Story of the Leprechaun by Katherine Tegen
A miserly leprechaun shoemaker is captured and must therefore grant a man three wishes.  Of course, one of these wishes is to know the location of the leprechaun's pot of gold.  The leprechaun tells him, but of course is able to pull off a sneaky trick to keep his gold well hidden.  Many St. Patrick's Day or leprechaun books out there are a bit too long for my storytime crowd, but this book was a good fit for my preschoolers.  Just enough mischief to keep things interesting, and the kids' giggles when she saw the leprechaun's trick made it more than worth the effort.

Good Luck Bear by Greg Foley
One day Bear finds a clover.  His friend Mouse tells him that if he can find a four-leaf clover, then he will have good luck.  Bear spends all day searching with no luck and his other friends are not very encouraging.  Just as Bear fears that he will be unlucky forever, Mouse returns with a surprise for his friend.  I chose this particular book because it does a good job of introducing the shamrock symbol in simple terms.  It's also a fairly quick read, which was welcome by the end of this storytime since our first two books took so long to get through.

Duckie's Rainbow by Frances Berry
Duckie walks home and sees many colors.  Soon purple clouds roll in and it begins to rain.  But the curved pages of this book reveal a beautiful rainbow.  I did not end up needing to read this story and instead talked about rainbows using the flannelboard discussed below, but it would be a great choice for younger or more fidgety groups if you need to substitute a shorter, more simple story.


I also incorporated a few fun rhymes into this storytime.  The first was the action song, "Dance, Leprechaun, Dance."  I didn't come up with this myself, but sadly can't remember what my source for this song was. 


Dance, Dance, Leprechaun Dance
Tune:  “Skip to My Lou”

Dance, dance, leprechaun dance,
Do a dance for me!

Bow...
Clap...
Jump…
Search for gold…
Sit...

Suit actions to words

This song was a lot of fun, and I was amused to see that none of the kids really had any idea how a leprechaun should dance without prompting.  I just did the first easy arm-flailing, knee-wiggling dance I could come up with the and kids more or less copied what I did.

We also got out my "Rainbow in a Pot" flannelboard, which was a great way for us to talk about rainbows in a bit more detail after seeing one briefly in The Story of the Leprechaun.  I discuss the flannelboard and the song that goes with it in more detail in this post.


To conclude this storytime we did a very simple art project that was surprisingly full of early learning opportunities.  I cut out lots of dark green hearts using our die-cut machine and gave four to each child.  They were able to glue them onto a lighter green sheet of paper to make a shamrock.  Since the paper was so big I also gave them crayons and let them draw whatever they wanted in the margins.  Many kids chose to draw other symbols of the St. Patrick's Day holiday that we had talked about like rainbows, pots of gold, and leprechauns, but they could choose to draw whatever they wanted and we saw all kinds of fun choices.  I loved the idea of giving the kids a chance to do some free drawing so that they could really get creative and personalize their artwork.  Drawing is also a great skill for kids to work on as these motions are very similar to the motions they will use when they eventually learn to write.  The two shades of green paper were also a subtle nod to the book Green that we had read.

Friday, January 15, 2016

Fortune Tellers

This month's passive program in the Teen area of the library is reading-focused.  I'm totally on board any time we can tie a program or activity in with our collection and encourage people to read and/or check out books because in the end, the library's collection is one of my highest priorities.

Do you remember Fortune Tellers?  Or perhaps you knew them better as Cootie Catchers?  These folded pieces of paper had the mystical power to answer all of your deepest childhood questions.  Did Jimmy have a crush on you?  Should you wear your blue shirt to Jenny's birthday party?  Would you mom mind if you ate a few more cookies?  Just make a few easy choices, open and close the Fortune Teller appropriately, and BAM!  A virtually instant answer from the universe, offering guidance and wisdom during troubling times.

I decided to take this trope and use it as a way to help bored teens pick their next read.  Teens can pick up a Fortune Teller (I made three different ones to pick from), make their choices, and then find out exactly which genre of book they are destined to try today.  If they don't like the answer that the Fortune Teller gives them (because hey, sometimes the universe gets it wrong), they of course are more than welcome to try again.


I put the Fortune Tellers on top of one of our book displays, along with a selection of books that fell into some of these genres.  Amazingly enough, with 24 different book fortunes, some of which are as broad as, "Read a book by a female author," literally anything at all from the collection goes.  Sneaky, right?  I used this as an opportunity to display books that are under-circulated and that need a little extra help getting into people's hands.

There is absolutely no way to track how many people are using the Fortune Tellers, but I'm really okay with that.  In a halfhearted attempt at more concrete usage-tracking I did put out a few slips of paper that people could fill out telling me what their fortune was and which book they selected, but I honestly don't really expect the teens to bother with this without further motivation.  I have been keeping an eye on display and have seen that the fortune tellers have moved a bit and that some of the books on the display have been checked out, so I suspect that it's seeing at least a little traffic.

In the interest of full disclosure:  I did not come up with this idea all on my own.  I found an image on Pinterest that used this idea.  However, I am unable to link to the original source as it has since been taken down or moved, and my saved link on Pinterest is no longer valid.  So big thanks to whoever it was that originally came up with the idea!

Saturday, January 2, 2016

Can You Have Too Many Books?

I'm part of a local mommy's group on Facebook.  I'm not super active there, but there's a question that pops up fairly regularly that I always like to put on my librarian hat to answer:


Q:  What is a thoughtful, fairly inexpensive gift that I can get for X Child who is X Years Old?  S/he already has everything, so I'm looking for a really interesting/unique idea.

My answer is always something along these lines:

A:  When in doubt, I love to give books!  You truly cannot have too many of them, you have lots of options to choose from (but you also really can't choose wrong), plus they promote learning / early literacy / parent-child bonding.  Board books and paperback  books are also fairly inexpensive, most costing under $10.  You really can't go wrong!


Occasionally someone will respond to my comment with the following counter-arguments.  While these are fair concerns, I think that it's really important for me to provide a few counter-counter-arguments.
 
I usually present this first answer in much shorter form with a more focused information depending on the situation, but here on this blog it makes sense to elaborate a bit more deeply:


CA:  But they already have SO MANY BOOKS!  I don't wan to give them more and add to the clutter.

CCA:  Oh, honey.  That's sweet of you to care about the trouble of having books strewn all over the living room floor.  And I get it.  I also have a very young child who owns a fairly obscene number of books.  And yes, I do occasionally mutter to myself about the clutter.  But really and truly:  You can't have too many books!  

I have observed, both from my own experience and the experiences of friends/colleagues as well as documented research (links below), that the more books a child has in their house, the more they read and the greater their future successes will likely be.  The books will not sit stagnant on the shelf.  They will be read if they are in the house and easily accessible.  It might seem like they have "enough" or "too many" books on the outside, but I can assure you that if you're seeing the books well enough to make this observation, you can be confident that they're being read.  A few more will only help this child love reading more, and that to me is more than worth a little bit of clutter.

Is the child very young and still being read to?  If so, I can all but guarantee that Mom and Dad are bored to death with most of the books already in their house, no matter how many they have and how wonderful they are.  A personal anecdote to illustrate this:  My 1.5-year-old daughter has about 75 board books.  It's a pretty ridiculous number; more than most people have.  But it only takes about two minutes to get through each one and because we have lots of books that are easily accessible, my daughter loves reading them and we go through a big stack every day.  It doesn't take very long for us to start repeating books, even with this large number to start with, and when we start repeating too often Mom and Dad get bored. Something new and clean and fresh will always be a welcome addition to the routine.

Is the child older?  Are they voracious readers?  If so, the same rule applies; The more, the better.  The books that you give will get read.  Are they more reluctant readers?  Then it's all the more important to give books, perhaps in a different genre or style than they are used to, in the hopes that you might help this child discover something new and exciting.  Most reluctant readers are reluctant simply because they haven't found That Book that sparks something with them.  They need a little nudge to find That Book.  They will only find That Book if people give them books.

Finally, the one or two books that you give are also not going to really going to add that much more clutter if they already have tons of books.  Mom and Dad find a way to make room on the shelf or in the storage basket.  They will continue to do so until the bookshelf collapses, at which point they will either do some housekeeping or buy an extra bookshelf.  Either way, it's not your job to worry about the clutter.  It's your job as the gift-giver to give a really nice gift, and books are great gifts.

A few links to interesting articles on the subject of having books in the home, both of which relate to the same study:
Pacific Standard
Education World


CA:  I just gave this child books at his/her last birthday / Christmas / Easter / other occasion.  Wasn't that enough?  I'd hate to be repetitive.

CCA:  Again, don't stress out about this.  As long as you give a different book, it won't be the exact same thing because each book provides a different reading experience.

Did you give them a book about dinosaurs at the last gift giving occasion?  Then give a book about colors or farm animals or outer space this time.  Variety is always good.

If you think an older child would be up to it, try giving books from a different genre than their usual to mix things up a bit, for example, giving something historical or a mystery to an avid reader of fantasy.  Alternatively, introduce them to a new, up-and-coming author in their favorite genre, or an older, classic series that they may not be aware of.

Don't forget about nonfiction too!  Has the child recently expressed an interest in anything at all - maybe sports, current events, opossums, the latest video game, or science?  I can all but guarantee that there's a book about that.  Find one to give as your gift to help the child further explore their new passion.

Most kids, especially those who love reading, will be happy to have more to read and explore.  More reluctant readers will hopefully be drawn to new subject matter.  The more books, the better!

Wednesday, December 2, 2015

Arm Knitting

A few weeks ago we had a very successful Maker program for teens & tweens devoted to a craft that I'd been wanting to try anyway:  Arm Knitting.

The idea behind arm knitting is that it is actually exactly like regular knitting, but you use your arms as very large needles.  While this might sound a bit intimidating to someone who has never tried something like this before, it's actually pretty easy to catch on.  There are tons of videos out there on YouTube that will show you the basics, but this one is the one that I liked best:


I taught myself to do arm knitting by watching this video with some yarn in hand, and I just copied what she did.  I already knew how to do "regular" knitting with needles, so I caught on pretty quickly.  Even without this background knowledge, it's not too hard to figure out if you pay attention!

This event was hugely popular.  I had 12 teen/tween girls sign up to participate, and another two dropped in unexpectedly.  We also heard lots of comments from parents who wandered into the library and saw my sample who said that they'd love to do something like this too, so our Adult Services department will be doing a similar program in a few months.

It was a bit challenging to teach everyone how to do the arm knitting because it is a skill that is much easier to teach one-on-one than to a group.  I did have the above video playing the the background on a loop for people to watch, and I think that helped.  I circled around to show people up close what needed to be done and, if needed, actually held the kids' hands and showed them what the motions needed to be like.  This helped a few who were slower on the uptake quite a bit.  Things were a bit hectic with so many people to help, and I do wish that I had had an assistant or two to help out with the instruction.  But we made do.

Casting on was by far the most difficult part, but once that was done everyone caught on to the repetitive motions needed to knit the length of the scarf.  I did have to remind them quite frequently to pull their loops snugly around their wrists so that their stitches would not be overly large (and there were a few who ignored this advice), but otherwise there were no real snags. 

To make an arm knit infinity scarf, you will need two balls of super bulky weight yarn.  You will hold the yarn double (one strand from each ball held together) to get the thickness that you need.  Of course, you could use only one strand for a thinner scarf, or more strands for a thicker scarf.  I provided yarn for all participants, and seriously lucked out when bulky yarn went on sale at Michaels just the week before my program.  I didn't spend more than $2 on each ball of yarn, which is a steal!  If you'd like to do this program, I recommend keeping your eyes peeled well in advance for similar sales, and have a coupon ready to help minimize your costs.

This was a challenging program to pull together, but I would absolutely do it again in the future.  Everyone had a good time, and I even had the mom of one of my participants drop in and tell me that they had bought more yarn to make more scarves on their own now that they knew the technique.  Success!

Tuesday, October 13, 2015

Star Wars Reads Day 2015

Guys, it's been awhile.  It's not that I haven't had interesting library stories to tell, it's just that I've been too busy to stop and tell them.

But I like to document what I've done, and since I don't believe in reinventing the wheel I think it's important that I contribute to the conversation in case someone else out there might be able to benefit from my experience.  So I'm going to try and start this up again.  Bear with me as I try to get back in the swing of things.


To kick things off, I want to talk a bit about Star Wars Reads Day.  We participated in this awesome national event for the third year in a row, and this was by far our best year yet.  We had huge attendance, which was a bit surprising because the weather was so beautiful and I know we actually lost several families to the pumpkin farm as a result.  Many of the activities were the same ones I had used in years past (balloon lightsabers, fortune Wookies, stick puppets, word search, trivia, memory, and a checklist to keep it all straight), which made planning super easy.  I did revamp an old favorite activity and added two new ones to keep things interesting:

Yoda Ears and Princess Leia Buns 

 
I borrowed this idea from Amy at Catch the Possibilities.  I made my own templates because I wanted to tweak Amy's design and printed the ears and buns off on construction paper.  I also cut two-inch strips of paper that could be fashioned into headbands.  The kids could cut out the ears/buns themselves, and then make headbands.  The Yoda ears were the most popular of the two options, but I was glad to have two different choices for this activity.

Scavenger Hunt


The scavenger hunt has been an old standby for the past few years, and while the kids love it and I love how it gets them to visit all areas of the library, I wanted to change things up a bit.  I borrowed the new format for the hunt from that same blog post that I linked to above and tweaked it just a bit.  I found pictures of eleven different characters and used Publisher to put a letter of the alphabet with each one.  These were cut out, laminated, and hung around the library.  Each kid got a worksheet that listed all of the places where they needed to look to find characters.  When they found the character, they needed to write down the corresponding letter of the alphabet in the appropriate box.  When all were found, they had a message from Master Yoda.  The kids could turn in their completed worksheets and get a bookmark as a prize.

Costumed Characters


This year, thanks to one of our awesome library regulars, we finally were able to get a few awesome members of the local 501st and Rebel Legion to join us for our celebration.  These guys were a big hit!  They spent two full hours in costume hanging out with the kids, taking pictures, watching the kids put on shows with their puppets, and generally just being awesome.  As a bonus, these organizations always advertise through their own outlets where they will be making appearances, so we got a little extra advertising for our event by working with them.  I know of at least two families who came to the library that day specifically because they had seen that the 501st would be there through their Facebook page.

Notes about costuming:

Yes, that's me in the Princess Leia costume.  I like to let my geek flag fly a bit at events like this.  :)

The clone trooper and Sabine (the two characters on the right in the above picture) were my contacts with the 501st and Rebel Legion.  They are parents to one of our long-time library regulars, and dad (the clone trooper) joined up with both organizations last year.  Mom, who is the parent we usually see, just completed her costume and I think might be joining the Rebel Legion in an official capacity soon.  Having people that we know who were already invested in the library as a contact was a huge help!  I was able to talk with our trooper friend before I submitted my request for characters to appear at the library to find out what times work best for people and when other groups were having their events that day to maximize the likelihood that we'd get a good response.  You certainly don't need to have a personal contact like this if you want to try to get the 501st and/or Rebel Legion to make an appearance at your event, but having this personal contact had some nice perks, especially since there are so many local events on Star Wars Reads Day.

Wednesday, May 27, 2015

Passionate Reading

Today I visited the 6th grade classrooms at our local school to talk about the Summer Reading Program.  After giving my spiel, a boy raised his with a question which resulted in the following dialogue:

"So I can read any book that I want this summer and it counts?"
"Yup, you can read absolutely anything you want."
"So if I want I can read medical textbooks?"
"Yes, you can read anything you want."
"YES!  I can read medical books!"

No sarcasm.  This kid apparently actually has a passionate interest in the medical.

This brings up a great point to remember about summer reading:  Part of the beauty of summer break is that kids no longer have teachers breathing down their necks to do specific kinds of work.  Summer is a great chance for kids to take a break from scheduled learning and instead focus on whatever it is that they are passionate about.  They can reread their favorite books for the hundredth time.  They can learn to juggle.  They can read about zombies or LEGOs.  They can learn even more about something cool they learned in school, or they can learn about something cool that their teacher doesn't have the time or ability to teach them.  Summer is a time when kids can become experts about whatever it is they like with no questions asked.

How cool is that?

So parents, it's okay to let your kid relax a bit this summer.  Let them dictate how their reading time is spent.  As long as they do at least some reading, they'll be the better off for being able to take some ownership of the effort.

Thursday, April 23, 2015

You Just Won't Have Time

A fourth grade girl was at the library with her family.  She selected a pretty big stack of picture books to take home.  I overheard mom's reaction when she saw the books:

"Don't take those books.  They're too quick to read, and you just won't have time to read them all."

The logic is lost to me.

Banana Keyboards


I found a half-finished version of this post saved as a draft in my blog's archives.  Oops!  I took a few minutes to finish writing and add a few pictures.  It's a bit belated, but enjoy!

This month's Maker Monday program delved a bit more into the tech than past programs as we experimented with a Makey Makey.

What is a Makey Makey?  Well, it's a nifty little device that can connect to a computer via USB.  You then can connect other objects to the Makey Makey to create your own custom keyboard using alligator clips.  Any object that conducts electricity would work fine:  Fruits, vegetables, houseplants, play-dough, other people, or even water.  Couple this with a few simple web programs that utilize the arrow keys and suddenly you can capture Pokemon with potatoes, play a tune on the piano with play-dough, win at Tetris with bananas, or drum a wicked beat on a houseplant.  The possibilities are limitless.

Jay Silver, one of the creators of the Makey Makey also gave a really awesome Ted Talk about his inspiration for the device, which I really recommend watching.  I did not show the video as part of my program due to time constraints, but it would be great to share if time allows because it helps get everyone into the proper mindset for thinking outside the box.  Enjoy it here:


I purchased a Makey Makey starter kit for $50, which comes with everything you need to get started.  You can find the kit for sale on Amazon, or you can buy directly from the Makey Makey website.  I also definitely recommend exploring the Makey Makey website to get lots of ideas for way that the device can be used.  They have links to a whole list of awesome recommended programs that work well with the Makey Makey, which is a great place to start.

Since only so many people can use the program at once, I decided to limit the size of the program to 5 people at a time with two time slots, one for teens and another for tweens.  Neither group completely filled (I had 4 teens and 2 tweens), but I was actually thankful for the small numbers as we tested what the Makey Makey could do.

On the day of the program, I set up a laptop and connected the Makey Makey.  I pre-loaded a couple of programs that I knew I wanted to try out (piano and bongos) so that they would be ready to go, and kept another tab open with the list of recommended programs to give us more options.  I set up another table with some conductive object to connect to the Makey Makey.

When the teens/tweens arrived, I have them a quick 2-minute rundown of what the Makey Makey was and how it worked.  Then I basically just let them go to town.  I let them decide which programs they wanted to test and which objects they wanted to turn into their keyboards and only offered a bit of advice and encouragement when it looked like they needed it, and occasionally challenged them to try something a little bit different or reminded them to take turns.  With such a small group, it was very easy to just let them experiment with the Makey Makey to discover what they could do with it.  As the afternoon progressed, everyone started to get even more creative and innovative as they tested the Makey Makey's limits.  It was awesome.

Check out these pictures to see some of the ways that the teens/tweens got creative with the Makey Makey.


Monday, April 6, 2015

Two Book Displays

Our book displays have been especially lovely lately.  I give full credit for this to my co-workers, who are very good at making these displays look extra-special.

The first display was done with lot of basketball books, both fiction and non-fiction, in honor of the NCAA basketball tournament.  The popularity of this display was, no doubt, helped by the Wisconsin Badgers' incredible run.  The big Badgers flag came from a staff member's house, and we posted an updated copy of the bracket every few days.


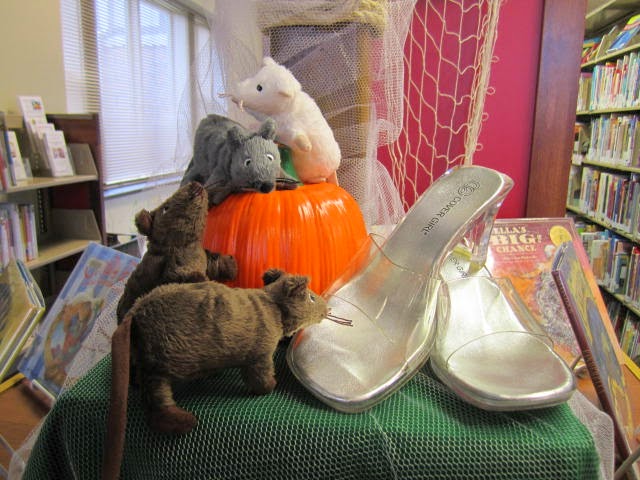
The second display was full of lovely Cinderella stories, in honor of the recent release of Disney's live-action movie.  The staff memeber who set this display up brought in her own shoes to use as the "glass slippers," and the mice and pumpkin came from our stash of storytime supplies.