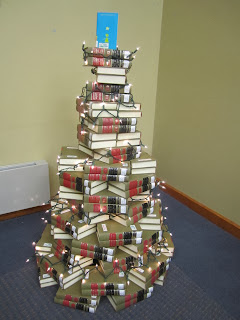
We had a teen event at the library today (more on that later). I placed my Teen Advisory Group in charge of planning decorations for the party, and they really wanted to create one of these trees. The books that we used ended up coming from our Reference collection. It's a set of law resources, including state statutes, court records, and who knows what else. The collection is almost never used, so no one missed the books while they were in use for the afternoon. We'd originally planned to use books that we had in storage to use as prizes during summer reading or books that had been donated to our Friends of the Library group for our book sale. But this set of books worked much better since they were all fairly thick and all the same size. Even better, the books are green and red - perfect colors for a Christmas tree.
It was the teens' idea to find a copy of Jerry Spinelli's Stargirl to place at the top of the tree. Genius!
Here are a few tips for anyone out there who may want to construct their own book tree:
- You need lots of books to make a tall tree. My tree used 123 books, and they all were fairly thick (2-3 inches). You'll need more books if your books are thinner, and fewer books if you make a smaller tree on a tabletop. I didn't measure the finished tree, but I'd estimate that mine was about 4'8" tall (including our Stargirl topper) and about 3' wide at the base.
- Paperback books are generally much thinner than their hardcover counterparts, and they're also much slicker. This makes them more difficult to use for a project like this.
- The tree is much easier to construct if your books are all more or less the same size. Different sized books can make for a very interesting-looking, eclectic tree and that's lots of fun too. It just takes a little bit of extra work to fit everything together.
- Getting the height that you need is the hardest part. Be sure to make your layers fairly tall (I recommend at least 4-6 inches per layer), and you'll probably need to have a few layers of the same width before you start to narrow the tree. Having three or four layers all of the same width not only gives you lots of extra height, but it also makes the whole tree a little bit more stable. If you look closely at my picture, you'll see that my tree has 16 layers of books, with each layer consisting of two books stacked together. The layers taper in as the tree gets taller and there are five different widths. If I would do it again, I would actually include a few extra layers of the widest widths at the bottom to give it more height and stability, and possibly use fewer layers of the narrower widths at the top.
- The inside of my tree is totally hollow. There's nothing in there supporting the books as the layers become more narrow. This was achieved just by being careful with how the books are arranged and by having several layers on top of each other that were the same width.
- I decorated my tree very simply with a single string of white lights. You could certainly include other decorations if you wanted, but I personally like how the books themselves are highlighted with fewer decorations.


No comments:
Post a Comment